homepage
  • Your recently viewed scenarios
    • Mike Red
      Ireneusz played the scenario
      Cream of the Crop
      von Garvin played the scenario
      One Tough Canuck
      Bongiovanni played the scenario
      Vogt's Ritterkreuz
      buser333 played the scenario
      Halha River Bridge
      Thompsonmg(MGT) played the scenario
      Breakthrough in the Arctic
      Lorenzoknight played the scenario
  • Not Logged In
  • Home
  • Shop for Scenarios
  • Article List
  • Reviews
  • Advanced Search
  • Scenario Map
  • Games Wanted
  • Publications
  • Scenario Picker
  • Contact
  • Events
  • Scenario Lists
  • Information
    • REST API
    • Privacy policy
    • Terms and Conditions
  • Login/Register
    • Login
    • Register
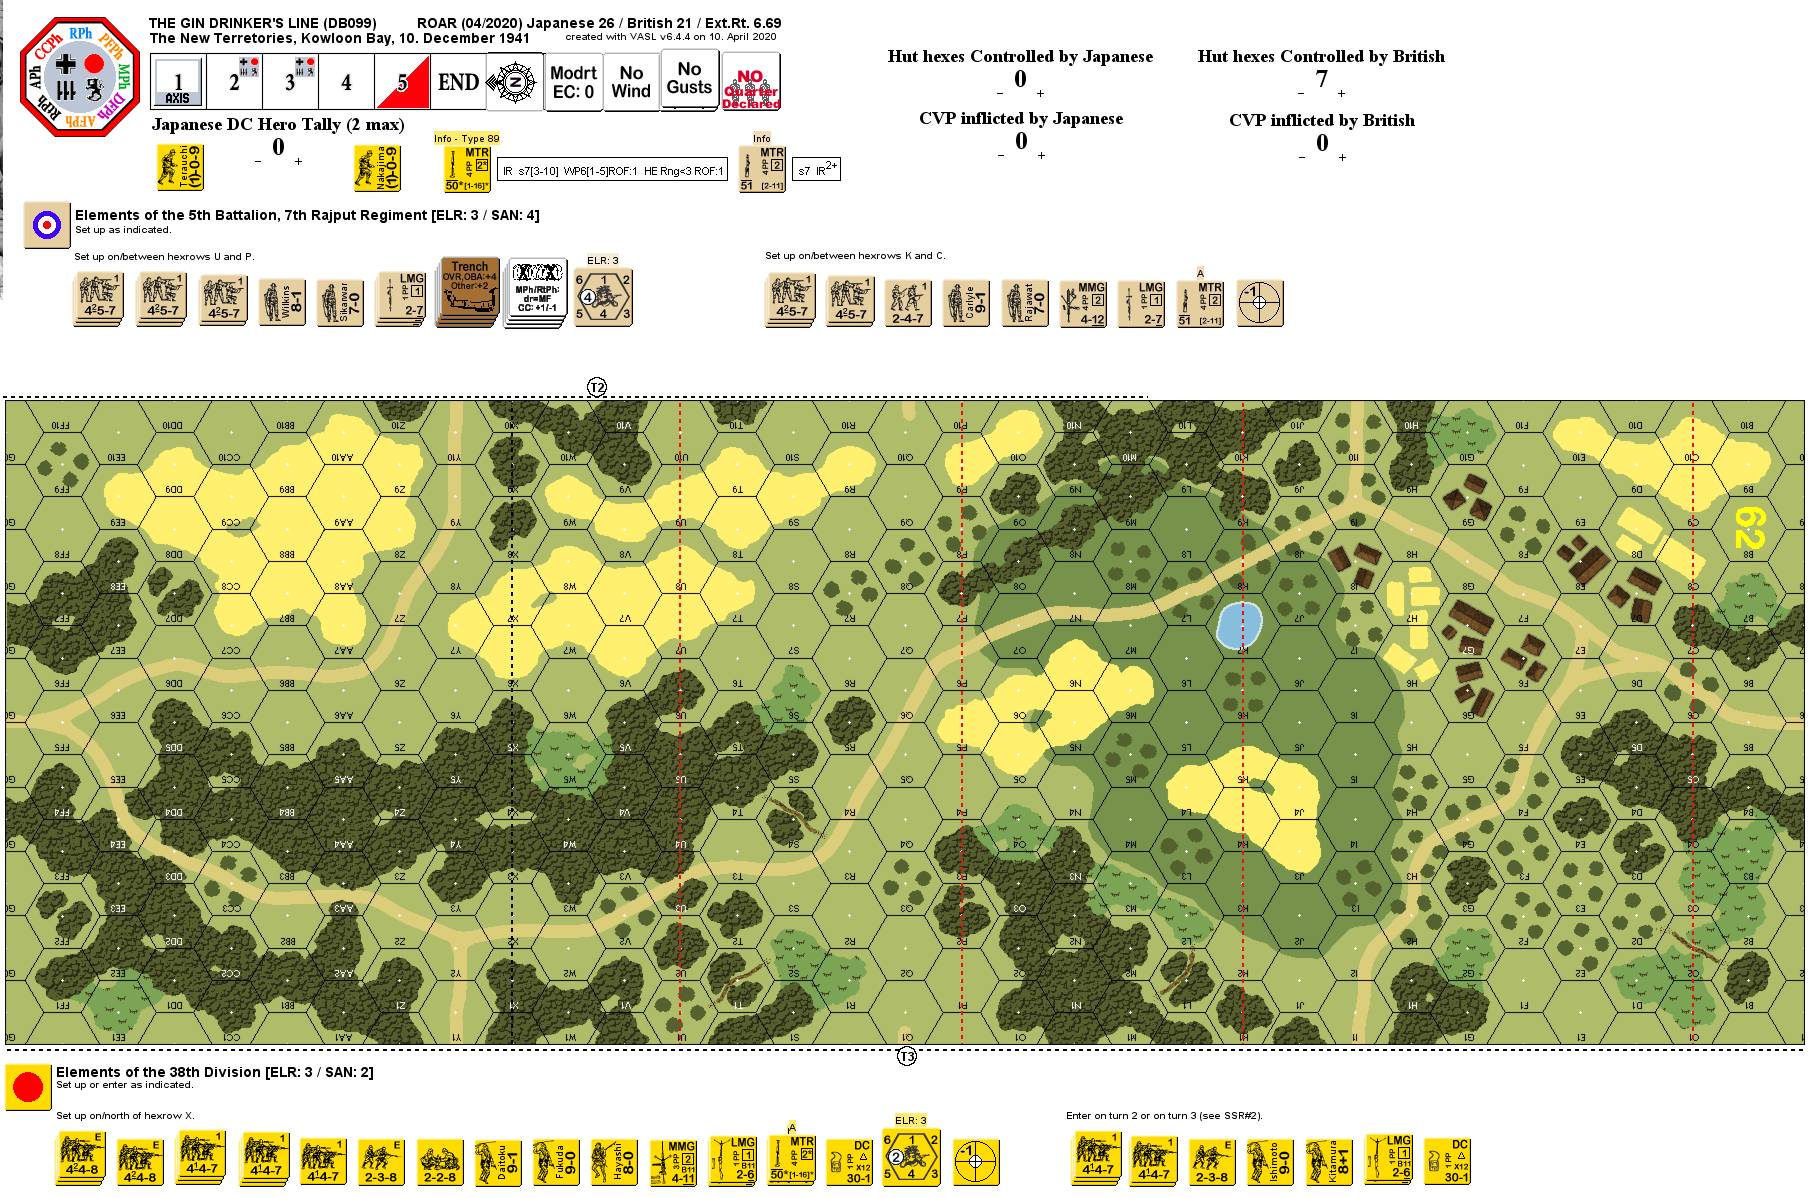
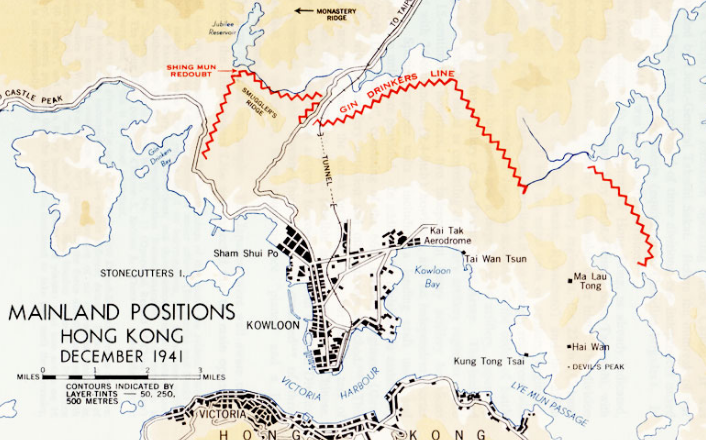
The Gin Drinker's Line CBI (id:#61622)
(Dispatches from the Bunker #35 ID: DB099)   [next]   [previous]
The New Territories, Kowloon Bay 1941-12-10 (4 others)
CH 14: Ninety Minute War (Critical Hit # 2)
CH 14: Ninety Minute War (Critical Hit Retro Magazine 2)
303: Ninety Minute War (ASL for Fun 2)
CH 14: Ninety Minute War (Critical Hit #2 2022 reprint)
Designer: Joe Gochinski
Starter kit scenario?:    Deluxe scenario?:
 
Balance:
JapaneseBritish
49.275362318841%

Overview:

After the successful capture of the Shing Mum Redoubt, the Japanese 38th Division began operations to clear the remaining positions of the Gin Drinker’s Line. Once this line was successfully cleared, Hong Kong proper would be open for invasion and capture. The men of the Japanese 38th Division were veterans of the fighting in China and attacked the Gin Drinker’s Line with zeal.
Attacker: Japanese (Elements of the 38th Division)
Defender: British (Elements of the 5th Battalion, 7th Rajput Regiment)  
4.5 turns
    Players: 2     OBA: None     Night: No
Unit Counts:
Squads: A:17.0 D:13.5
AFVs: A:0
AFVs: D:0
Guns: A:0
Type 89 Heavy Grenade-Launcher x 2
D:0
OML 2-in. Mortar

Victory Conditions:

Exit VP: Building Control VC: Area Control VC:
Unit Based VC: LOS Style VC: CVP Cap:
Misc Rules: Grain and Orchard in season, all buildings considered Huts.
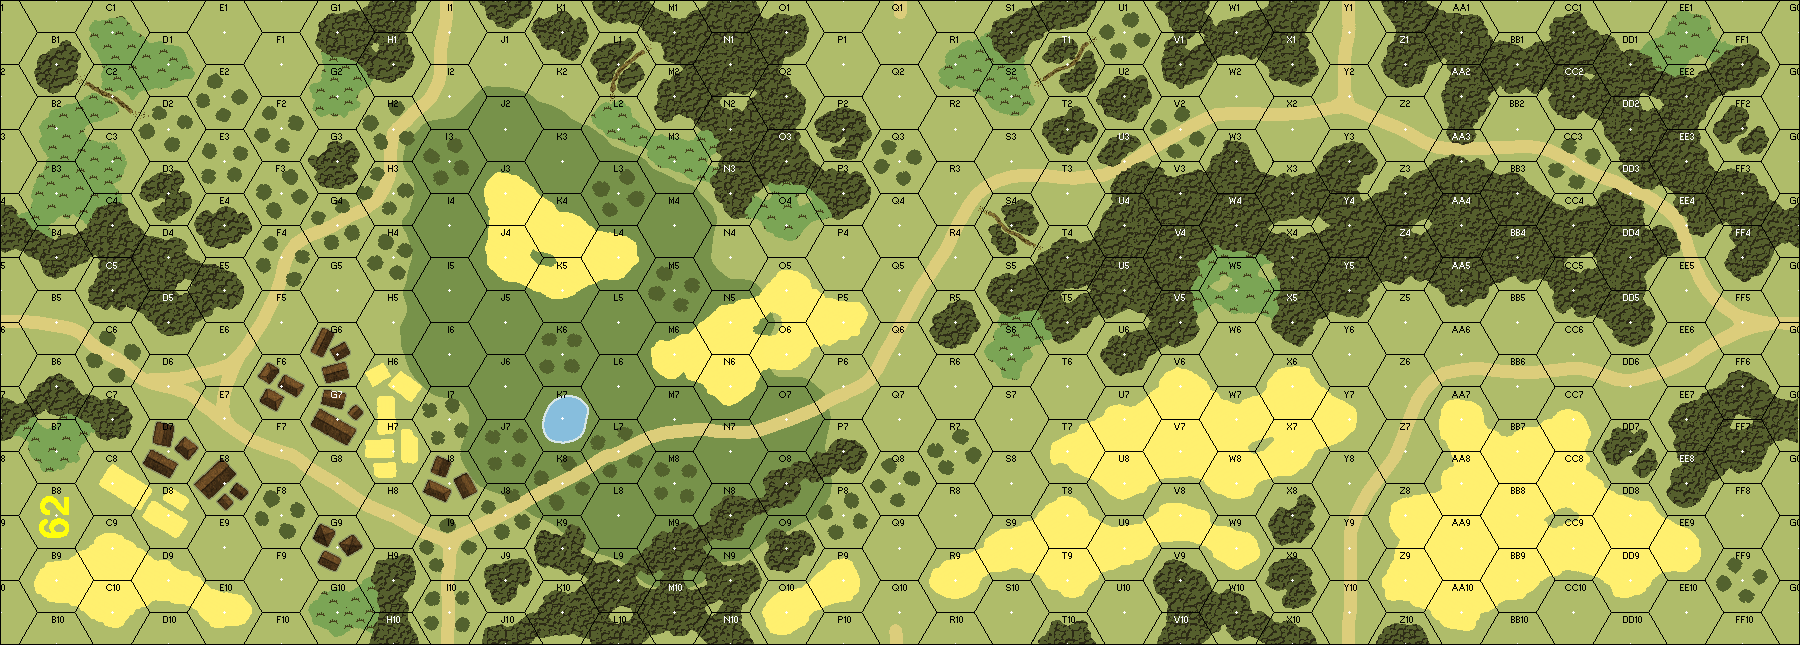
Map Board(s): 62
Overlays: NONE
Errata (source)
Players wanting to play this game/Request a match:

Scenario info

  • Recent Playings
  • Latest Updates
  • User Files
  • Public Lists
  • Comments
  • Links/References
Last Played:
DateReporterOpponentBal.ResultComments
2023-01-22(D) Shane Pask vs Steve Lessing Japanese winCancon 2023 Wire was placed well and held up the Japs but not long enough. One of my Squads went berserk then managed to ambush the Japs but died anyway. Reinforcements entered turn 2. I was never going to win the kill ratio but almost held on to the village.
2023-01-22(A) Rich Weiley vs Simon Spinetti Japanese winCanCon 2023 - Round 3.
2021-12-07(D) Tom Abromaitis vs DrawJapanese win. Solo. Brutal game. Lots of snakes and boxcars.
2020-11-08(A) Rich Weiley vs Dave Wallace Japanese winPlayed over two Sunday mornings on VASL. The dice bot was with me in this one especially in the first session. I lost a couple of half squads to K results but didn't have a squad stripe until the second last turn. Turning point was in the Japanese defensive fire phase in turn 2 when the woodpecker went on a rate tear killing the British 9-1 and breaking two squads (one of which was reduced to half squad) and compromising the defence of the village as it left the British MMG unmanned - there was a hero in the hex with the MMG but it took this character two turns to find it. By turn four all the British leaders bar one were dead and he was stranded on the wrong side of the valley. Smoke from the light mortars blinded the surviving pockets of resistance and the Japanese were able to occupy the necessary huts while mopping up most of the remaining defenders either by failure to rout or in CC
2020-04-25(A) X von Marwitz vs Miguel Guerrero British winSet in December 1941 close to Hong Kong, this scenario pits a Japanese Infantry force against British (Indian) Infantry defenders. At this time, No Quarter is not in effect per default as we are normally used to in PTO. PTO Terrain is not in effect in this scenario, but Wooden Buildings are Huts.

The Indians have 4 Trenches and 4 Wire to help their defence. Basically, the Japanese on-board force must approach and cross a depression, emerge on the far side to capture some huts. They will be reinforced either during Turn 2 from the east (top) or during Turn 3 from the west (bottom). Objective is to capture a number of Huts while gaining more VP than the British. Prisoners don't count double and each Hut held also worth 1 VP. With 4 1/2 Turns, the Japanese have to time to lose.

We forgot about the possiblity of Huts catching fire due to certain sorts attacks until late in the game. Both of us agreed that this might change significantly, how this scenario might play. ROAR had it at 26 Japanese / 21 British as of April 2020 before our game.

The Japanese have to cover quite some distance until they can reach the Huts which are the objective. The Indian units that have to set up on/between hexrows U and P will be at the sharp end first. Those Indians setting up on/between hexrows K and C will mostly be firing at long range if they want to support their comrades up front.


(Turns 1 and 2)

Looking at the defensive setup of my opponent, I saw that he knew his business. I think that I selected the approach which he did not expect but that would take longer. This helped me to keep my initial losses low but I was hindered by some of his Fortifications costing some extra time which is of the essence. Furthermore, I could not use Banzai Charges in the way I had originally intended. Meanwhile, the Indians were able to pull back their up front force mainly intact, preparing against a Japanese Turn 2 entry from the top.


(Turn 3)

I had Japanese enter on Turn 3 from the bottom, determining that the later entry would be offset by the need for the Indians to redeploy to face the threat and the necessity to defend a broader approach. The reinforcements saw some Stripes by his infantry screen. During Turn 3 at long last, I had set the Japanese up to do Banzai Charges in the next turn in earnest. The Indians used their turn to redeploy some of their force to meet the Japanese reinforcements and some into the depression against the Japanese that would soon cross.


(Turn 4)

The Japanese MTR that still had SMOKE brought down some cover, then the Japanese MMG managed to break the British MMG-squad led by the 9-1, which would both surely help in the MPh. After that the first Japanese moves prepared the Banzai Charges by limiting later Indian Subsequent First Fire options. Then, the execution of the Banzai Charges and their order required some chess-like careful and brain-whacking considerations. The first and largest Banzai Charge went quite well with minor losses and brought the Japanese across the depression with the possibility to advance up out. During the first Banzai Charge, a DC Hero was created to charge the Indian 8-1 plus 457+LMG, which my opponent could not ignore. The DC Hero died just short of his target but drew significant fire, helping the other Japanese with his sacrifice for the Emperor. The second Banzai Charge basically took a similar direction as the first one, also reaching the far side of the depression and dodging most of the Residual FP and mostly free from Indian Subsequent First Fire. The third Banzai Charge was the smallest but very important as it sucessfully flanked into the Indian rear and reached the Hut in D7. Some Japanese advanced out of the depression into the teeth of the Indian fire of the upcoming half-turn. In the rear area around D7, some HtH did occur that went mostly in favor of the Japanese, but there was a pesky Indian HS+LMG surviving. Yet, the Japanese in the Indian rear were a real pain for my opponent.

During Indian Turn 4, my Japanese received some inevitable punishment by Indian fire. During the MPh, the Indians tried to approach my Japanese in their rear with no less than three individual leaders intending to pave the way for followers, to advance into non HtH CC, and to block Japanese movement in Turn 5, but all of these were stopped with two being Pinned and one broken. Furthermore, he was extracting some Indians that were still in the depression. Some broken Indians had rallied and altogether 3 LMG were waiting to dish out for the decisive last Japanese half-turn.


(Turn 5)

At the start of this last half-turn, I had one hut under Japanese Control in the Indian rear and would get the second one because the previously surviving HS+LMG had been broken by Defensive Fire in the Turn before. The hut most to the front was only held by an Indian HS as more Indians intended to reinforce it hat been broken or Pinned the Turn before. A striped 348+LMG was sitting ready to paste an enemy 457 in ADJACENT G6 hopefully breaking it to take away some of the Indian defensive fire. The Japanese would be able to mount 3 Banzai Charges. First, though, these would have to be prepared.

After the first three Turns, I had thought that I would never have a chance to win this but now the outlook was quite good. Still, it would be a tough call with my Japanese needing to secure at least four more huts and to dish out more CVP than they got. So preparation began with my MTR placing an important SMOKE round on the foremost Hut with its resident Indian halfsquad protecting my ADJACENT two striped squads plus one LMG and hindering some other upcoming Indian Defensive first fire. The Indians had one 457 in the Huts in G6 and F6 each, while the G7 Hut was vacant. Unfortunately, my Prep Fire of 10+1 (IIFT) by my ADJACENT 348+LMG vs. G6 had no effect. Nor did a 5+1 shot on the 457 in F6.

This, in fact, would make the upcoming Banzai Charges against this cluster of Huts much more dangerous. The first Banzai Charge was by the 9-1 with 348+LMG and another 347+LMG. The latter charged an Indian HS in the depression which was ADJACENT to two of my striped squads which would have to advance into the foremost Hut in I8 to despatch the defening HS there later. My 347+LMG survived the TPBF and thus eliminated the possibility of the British HS screwing up my advance by a lucky shot. The 9-1 with 348+LMG braved an 8-1 shot by the 457 in G6 and some other defensive fire. Then the 9-1 forked off to enter G6 surviving Final TBPF by the 457 within. G6 now occupied by a friendly unit, this allowed my 348+LMG to charge G7, securing that Hut. Alas it was shot at by a 6-1 attack which rolled a 3 and thus was CR'ed and the rest broken. For that reason, it could not enter F6 to enforce target selection limits on the unmarked 457 within. This was quite a disaster. As a backup, I had saved my 9-0 in E6, which conducted a single handed Banzai Charge targeting F6 with the aim of imposing Target Selection Limits and forcing the 457 within to fire at him. My 9-0 was shot at along the road for two times shrugging off the first MC but rolling boxcars on the second. The attempt at F6 had gained the Indians 2 extra VP and the 457 within was still unmarked. The third and last Banzai Charge would have to do the trick now. From I5 with a 9-0 and 237 HS and H4 with a 237 HS forth they charged surviving residual FP attacks. One 237 imposed Final Protective Fire on the 457 in G6 which broke the Indians while it remained unscathed itself. Good! Then the 9-0 with 237 had to cross some open ground being attacked at 8-2 by the 457 in F6 and surviving to enter F6 and Final Fire in there unharmed. Another Japanese HS guarding a HS prisoner moved ADACENT to F6, yet another one moved to C7 doding a FireLane attack and by this would earn 1VP because an Indian HS would now be eliminated for Failure to rout (as would be the Indian brokies in G6).

Indian Defensive Fire Phase did not see any meaningful action as almost all fire had been done during the Japanese MPh. Unfortunately, Advancing Fire did not have any effects except importantly Pinning the 457 in F6. But my Japanese Guard HS in E6 Massacred its Prisoners with the intention to advance into the crucial upcoming CC in F6.

During the last APh, the Hut in D7 was secured by my HS from C7. A 347 advanced into the Hut in I8 to engange in CC with the defending HS there. The 237 advanced into crucial F6 against the Pinned 457 reinforcing my Lax 9-0 with another 237. I braved the possibility of Ambush there of which there would be no chance if I had attacked with the 9-0 and 237 alone. Then, in J7 my 347 was pitted against a British 247. At this point, the VP value was 4 huts Controlled by the Japanese and 13 CVP inflicted on the Indian for a total of 17 VP for the Japanese and 3 Huts Controlled by the Indian and 16 CVP inflicted on the Japense for a total of 19 VP for the Indians.

First CC was J7 at 3-2 @ -1 for the Japanese needing a 9 to kill the HS for 1 VP and at 1-2 for the Indians needing a 6 to reduce and 5 or less to kill the Japanese for 1 or 2 VP, respectively. No effect for both sides.
Second CC was I8 with net -1 for Ambush for the Japanese. No Ambush. The CC was again at 3-2 @ -1 for the Japanese needing a 9 to kill the HS for 1 VP and at 1-2 for the Indians needing a 6 to reduce and 5 or less to kill the Japanese for 1 or 2 VP, respectively. The Japanese rolled Snakes to kill the Indian HS being safe from retaliation and securing the Hut for 2VP. Score now 19 to 19, Japanese Control 5 Huts, British 2.
Third CC was F6 with net -1 for Ambush for the Japanese (Lax, Stealthy, Indians Pinned). Japanese roll 1! Indians roll 2!! No Ambush!!! The CC was 5:4, i.e. 1:1 @ -1 for the Japanse needing a 7 to kill and 8 to reduce the Indians, and 1:2 @ +0 for the Pinned 457 attacking a Japanese HS+Leader needing 6 to reduce and 5 to kill their adversaries.

Japanese roll 11 for no effect, Indians roll 4 to kill the 9-0 gaining 3 VP and ending up in Melee with the surviving HS. 19 VP for the Japanese, 22 VP for the Indians. My Japanese lost.

After a slow start, my Japanese came back with a vengeance and favorable chances for the last turn only for failing their Emperor in the last but crucial instant. A very exciting game that came down to the last CC roll.
View all or balance report
ActionDate
Pte Parts Added a playing2023-01-30 01:58:06
Pte Parts Rated the scenario2023-01-30 01:53:53
Rich Weiley Added a playing2023-01-24 03:21:30
TomAbromaitis Added a playing2021-12-08 15:11:46
Rich Weiley Added a playing2020-11-08 06:25:41
FileDescriptionUserViews
(japbrit.png)Imagehoxson1625
(gin drinkers line.png)Imagehoxson1491
VASLMap (DB099-VASLMap.png)Map Imagebkemp01766
(gin drink map.png)Map Imagehoxson1480
(DB099 The Gin Drinker's Line v644 Scenario Archive.jpg)Map Imagevon Marwitz378
DescriptionUploaded by
TitleAuthorDate
DescriptionUploaded by

Quick Map View

Location

Not found

Images

 
Statistics:
Avg Rating: 7.50Votes: 24
Views: 2773
To-Play list count: 3
Estimated Play time: 3.5 hours
Recorded Games: 20
Archive recorded plays:
Japanese11
British8
Drawn:1

ROAR Data: (as of November 2021)
The Gin Drinker's Line
[Log in to Confirm or Edit]
[A] British 23
[D] Japanese 27
All Rights Reserved. (c)2022 Dave Ramsey.