Broken Column WTO (id:#66926)
Oosterbeek, The Netherlands
1944-09-17 (50 others)
106: Kangaroo Hop (ASL 5a - For King and Country)
ABtF01: The Prize (HASL 6 - A Bridge Too Far)
ABtF CG I: Block by Bloody Block (HASL 6 - A Bridge Too Far)
ABtF CG III: A Bridge Too Far (HASL 6 - A Bridge Too Far)
A 32: Zon with the Wind (AH:ASL Annual `91)
BB11: Kangaroo Hop (Backblast # 2)
G43: Kangaroo Hop (AH:The General # 31.6)
S14: 88s at Zon (ASL Starter Kit #2)
TB 1: Breaking In (Arnhem: The Third Bridge (1st Ed.))
TB CG 1: Taking the Prize (Arnhem: The Third Bridge (1st Ed.))
RP 6: Slam Dance (Rout Pak I)
M4: Tiger Route (Rout Report # 1)
Z11: Slam Dance (Rout Report # 4.4)
FE 125: Lessons Learned the Hard Way (Oblivion Pack)
GSTK 3: Real Men Stay in School (God Save the King)
GSTK 4: The Pillbox (God Save the King)
GSTK CG 1: God Save the King (God Save the King)
MM98-D: Climax at the Mures Defile (March Madness `98 Pack)
CAW11: Operation Wellhit (Canada At War 2)
PJ1.3: Gough, Forward!!! (OAF Playtester's Journal # 1)
PJ1.4: Grave Bridge (OAF Playtester's Journal # 1)
PJ2.4: Horrock's XXXth Corps (OAF Playtester's Journal # 2)
SE5.2: Rough Road to Arnhem (OAF Special Edition # 5)
SP7: Delayed on Tiger Route (Schwerpunkt # 1)
SP104: Easy's Bridge (Schwerpunkt # 9)
SK 1: The Long Left Flank (ASL Digest # 3.10)
Mission 3: Hell’s Highway (Band Of Brothers)
RPT6: Cadets and Cadre (Rally Point # 1)
1: Tiger Route (Witches Cauldron: Oosterbeek Perimeter)
6: Valley of the Dead (Peleliu: White Beach One)
ATB1: Night March (Arnhem: The Third Bridge (4th Ed.))
BB 22.1: Less Than Expected (Coastal Fortress)
BBD # 1: Tiger Route (Brave But Doomed)
BBD # 2: Brave But Doomed (Brave But Doomed)
VV57: Tiger Route (Vae Victis HS #11)
WO16: Wildcat Strike (Winter Offensive Bonus Pack 2015)
CA!12: Steel From Stalin (Counterattacks 2)
SB5: Stampede of the Wild Buffaloes (ASL Journal #11)
188: Zon with the Wind (ASL 3a - Yanks (2nd Edition))
Pegasus 1: Problemet Krafft! (Unknown)
#1: New Street Brawl (Battle at Best)
#2: Incident At The Crossroads (Battle at Best)
#7: Snap Back (Monte Altuzzo: Gothic Line 1944)
Q16: Defence of St. Oedenrode (Quick 6 Scenario Pack III)
WO37: The Vital Hours (Winter Offensive Bonus Pack 2021)
BISt #4: New Allies (Steel And Blood)
HFP #8: Along The Opalos-Vilagos Line (Freedom's Price - Hungary 2)
DB183: St. Oedenrode Bridge (Dispatches from the Bunker #57)
GJ137: Krafft's Blocking Line (Part I) (Grumble Jones)
GJ137: Krafft's Blocking Line (Part II) (Grumble Jones)
Designer: Brian Youse
Starter kit scenario?: Deluxe scenario?:
Balance:
BritishGerman
Overview:
After approximately an hour, all three battalions of the 1st Parachute Brigade had formed in their landing zones and were prepared to move to Arnhem. Lt. Col. John A.C. "Tony" Fitch's 3rd Battalion was tasked with moving down "Tiger" route, the center of three routes the British planned to use to drive towards Arnhem. With its parachute infantry in long columns mixed with jeeps towing anti-tank guns, the battalion met scattered resistance as it pressed on to Arnhem, each time stopping to dispatch the blocking German troops and then reforming into column to continue to advance. As the route neared Oosterbeck, the path became more and more built up, and the column ran into a larger German force of anti-tank assets and infantry.Attacker: British (3rd Battalion, 1st Parachute Brigade, 1st Airborne Division)
Defender: German (SS-Panzergrenadier-Ausbildungs und Ersatz-Bataillon 16)
8.5 turns
Players: 2 OBA: None Night: No| Unit Counts: |
| Squads: A:12.0 D:10.0 |
| AFVs: A:0 Jeep(a) x 3 |
| AFVs: D:0 |
| Guns: A:3 OQF 6-Pounder 7-cwt x 3 D:1 7.5cm PaK 40 |
| Misc Rules: | Ponds: Level 0 OG. A: Enter in Convoy (E11.) and single Column (E11.5) D: Not SS (A25.11) |
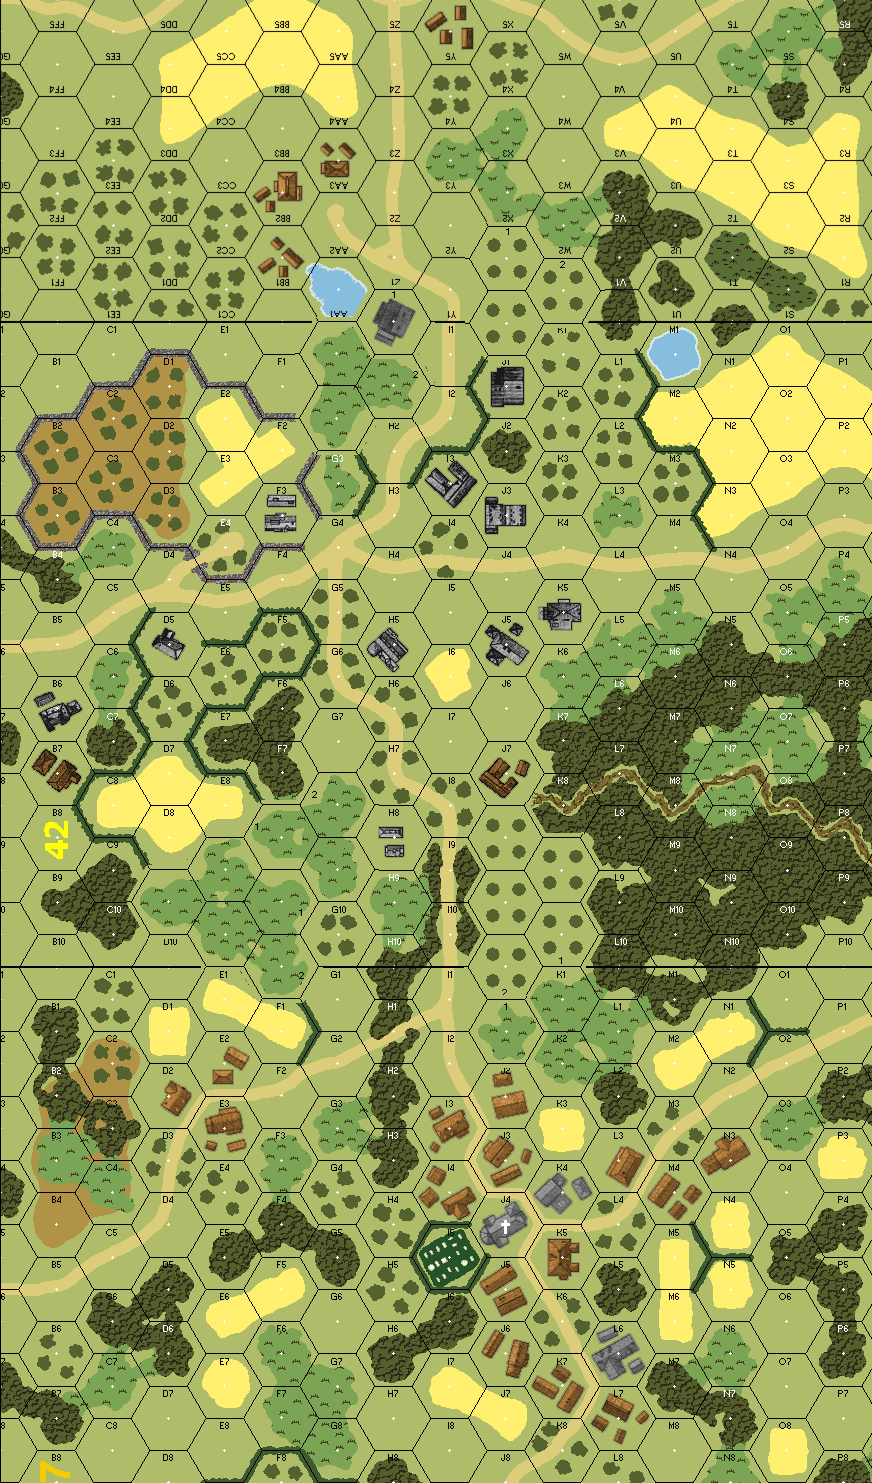
| Map Board(s): |
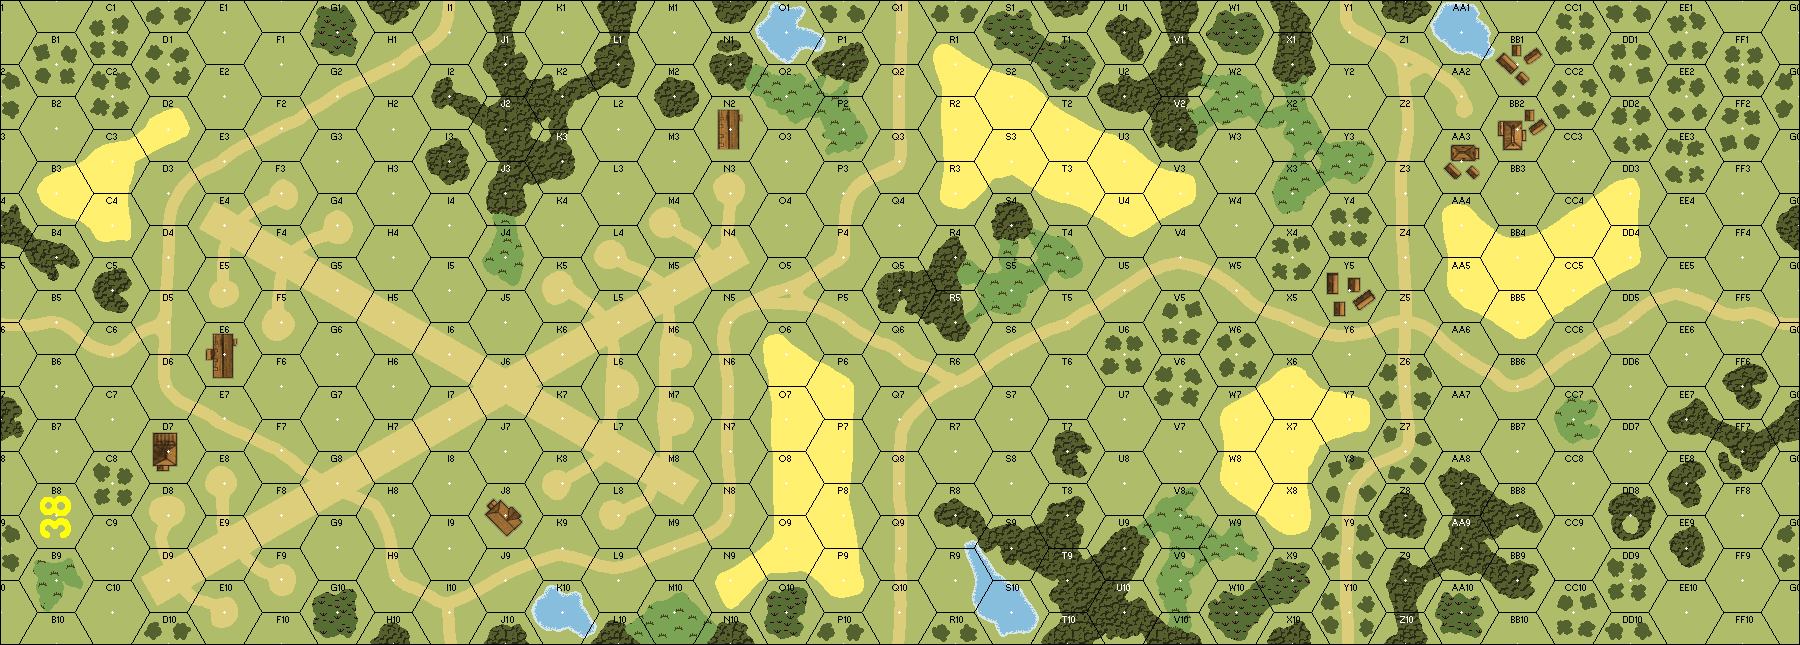
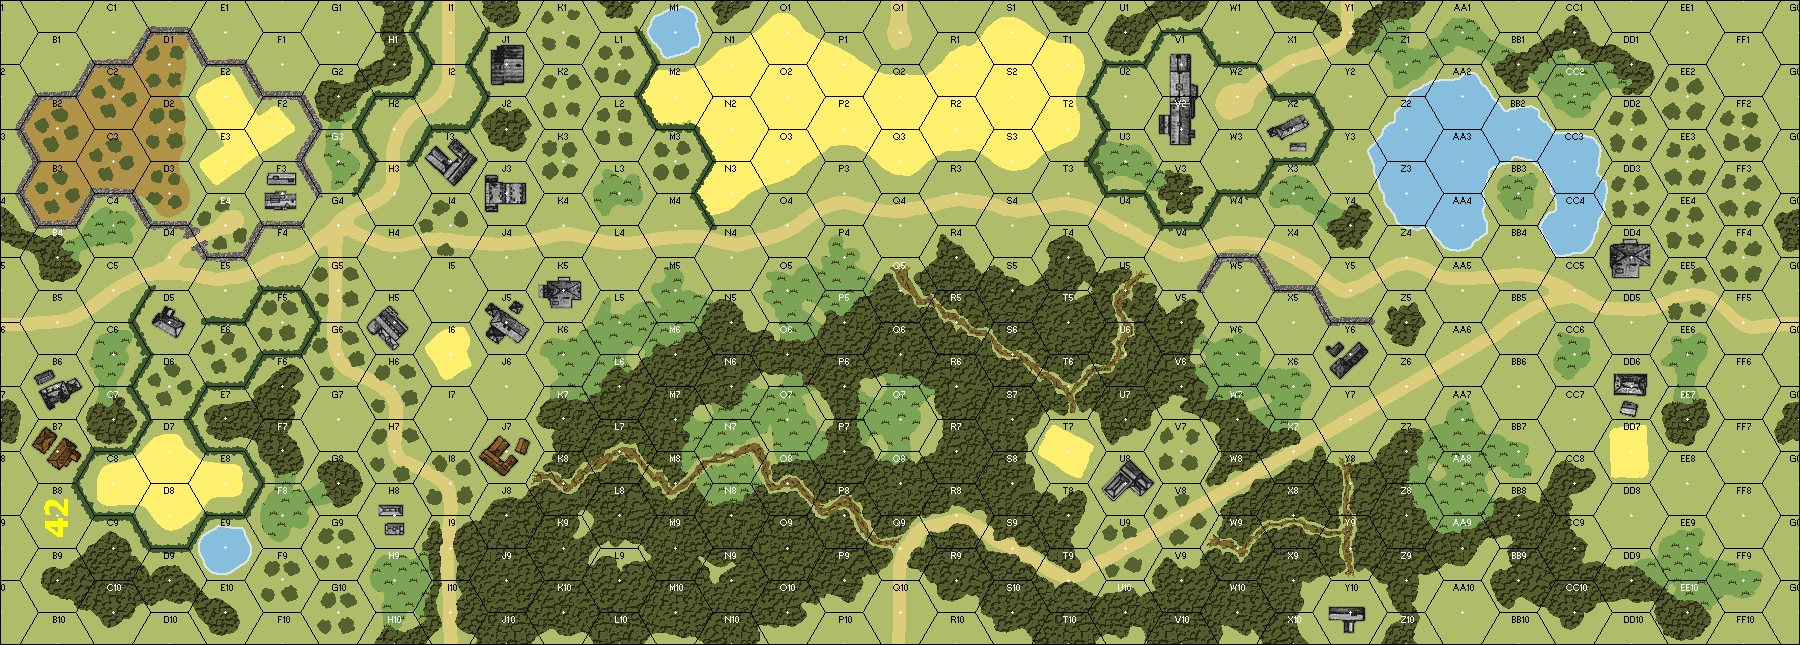
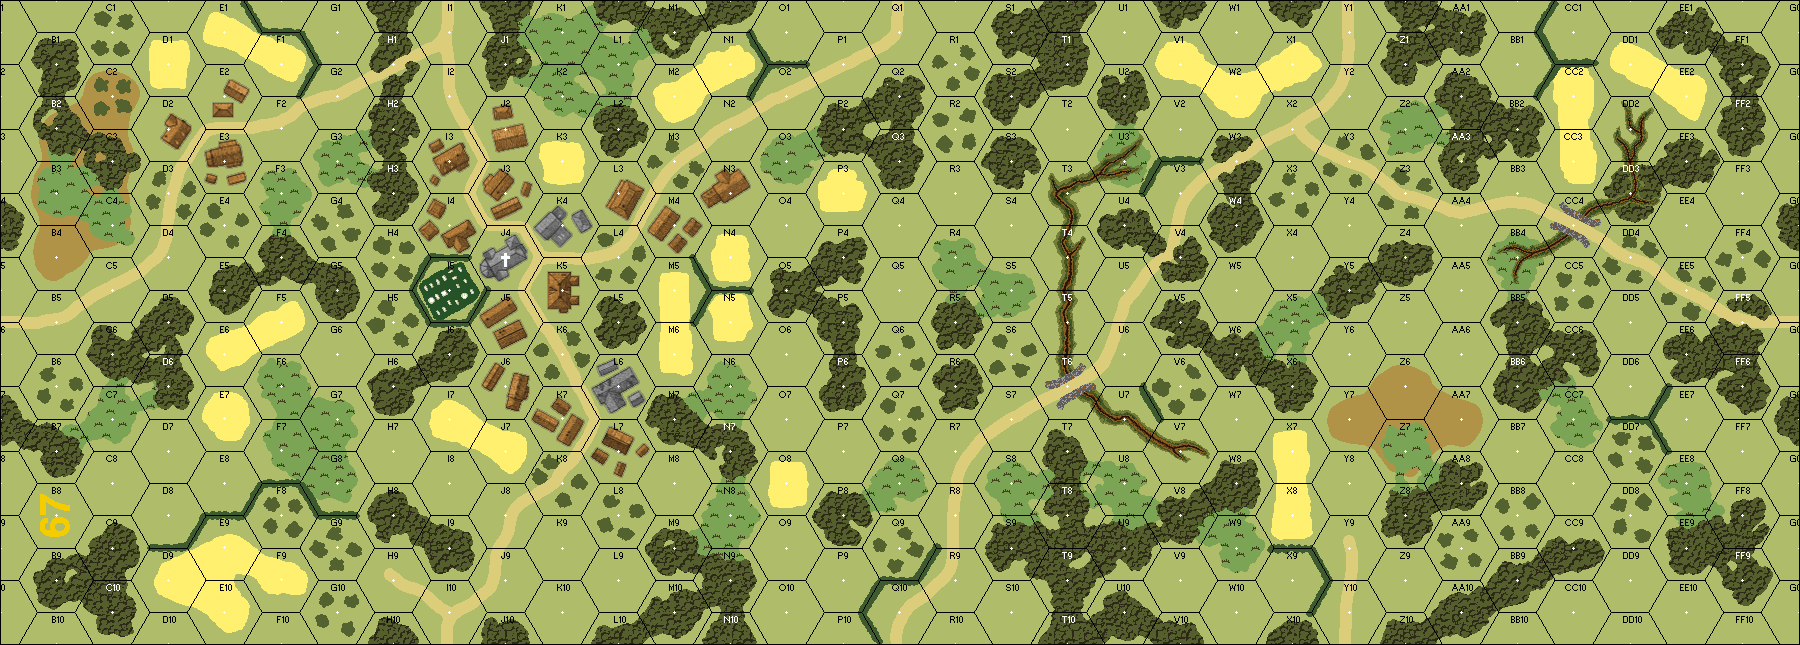
| Overlays: | B1 | B3 | B4 | B5 | O3 | O5 | X7 |
Errata (source)
Players wanting to play this game/Request a match:
Scenario info
Last Played:
| Date | Reporter | Opponent | Bal. | Result | Time | Comments | |
|---|---|---|---|---|---|---|---|
| 2026-01-24 | (D) Jason Nichols | vs | Chris Hofland | German win | My defence forced Chris to fight all the way and I was able to retreat most units in good order. I was able to move two squads and a leader around the flank into the rear and attack two jeeps directly, knocking them out with small arms. Chris resigned as he had one jeep left and was still on board 42 with my AT gun still unaccounted for. Unbeknown to him I had set the AT gun up on the hill and had no LOS to any of the road hexes. Still it would have been a difficult task to exit in the time left. | ||
| 2025-06-24 | (D) Tuomo Lukkari | vs | Victor Rosso | British win | |||
| 2025-03-09 | (A) Robert Wiebe | vs | Steve Slunt | British win (VASL Log) | 3 hrs | Interesting scenario start with absolutely no idea where any of the Germans are setup, and only 4 half-squads initially to scout forward with. Steve setup on the left flank mostly with his 75L in the middle, and a couple of nasty surprise MG nests in village area. Unfortunately his die rolls were off, and some key ones were missed. My jeep convoy stayed in conoy formation until Turn 8 before they finally gained freedom of movement right at the bottom of the village from his last 447 holdout who flubbed his lines and was unable to close the deal at point blank several times. The British were able to exit the required VP off by the end of Turn 8. | |
| 2025-02-06 | (D) Jon Jaramillo | vs | David C | German win | 2 hrs | I took the defending Germans and set up a forward defense. All German units set up hip which is great. I decided to set up in places with long Los and street fighting opportunities as the British need to exit 1 of 3 trucks towing an AT gun. Kill all three trucks and the scenario is over. The British have 9 turns and a lot of infantry firepower to move these trucks two board lengths. My opponent made the mistake of trying to move the trucks with the infantry, which gave me some nice 8fp shots on the star line. I didn't even need to kill as immobilization would have had the same effect. I ended the scenario in German turn 5 taking out the last truck with prep fire small arms fire. Fun scenario but I would have definitely held those trucks back until the 8fp stack had been completely neutralized. | |
| 2024-12-11 | (A) Jim Thompson | vs | Vince Lewonski | British win |
View all or balance report
| Action | Date |
|---|---|
| Nicho11 Added a playing | 2026-03-04 01:58:19 |
| asloser Added a playing | 2025-06-24 05:20:39 |
| Ahriman667 Added a playing | 2025-03-09 03:52:31 |
| Ahriman667 Rated the scenario | 2025-03-09 03:46:00 |
| tatumjonj Added a playing | 2025-02-06 02:19:44 |
| File | Description | User | Views |
|---|---|---|---|
| (britab-german.png) | Image | Hutch | 858 |
| VASL Log file (AR1_Start.vlog) | VASL Game Log | Ahriman667 | 747 |
| AR1 Broken Column Map (Broken_Column.png) | Map Image | Uncle_Duke | 920 |
| Description | Uploaded by |
|---|
| Title | Author | Date |
|---|
| Description | Uploaded by |
|---|
Quick Map View
Location
Images

| Statistics: | ||
| Avg Rating: 6.08 | Votes: 12 | Views: | 0 |
| To-Play list count: | 2 | |
| Estimated Play time: | 5 hours | |
| Recorded Games: | 9 | |
| Archive recorded plays: | ||
| British | 5 | |
| German | 4 | |
| Drawn: | 0 | |
| ROAR Data: (as of today) Broken Column [Confirmed] |
| [A] British | 8 |
| [D] German | 7 |