Bite of the Bassotto MTO (id:#61080)
Near San Casciano, Italy
1944-07-27 (7 others)
D15: Barkmann's Corner (DASL 2 - Hedgerow Hell)
FrF31: Pursuing Frank (Friendly Fire Pack 4)
BFP-22: Speed Over Caution (BFP 2: Operation Cobra)
BoF09: Pursuing Frank (Best of Friends)
GJ095: Passing Through Red Line (Grumble Jones)
D15: Barkmann's Corner (Deluxe Advanced Squad Leader)
BoF19: Bite of the Bassotto (Best of Friends 2)
FrF31: Pursuing Frank (Friendly Fire Pack 4)
BFP-22: Speed Over Caution (BFP 2: Operation Cobra)
BoF09: Pursuing Frank (Best of Friends)
GJ095: Passing Through Red Line (Grumble Jones)
D15: Barkmann's Corner (Deluxe Advanced Squad Leader)
BoF19: Bite of the Bassotto (Best of Friends 2)
Designer: Peter Struijf and Chris Mazzei
Starter kit scenario?: Deluxe scenario?:
Balance:
New ZealandGerman
Overview:
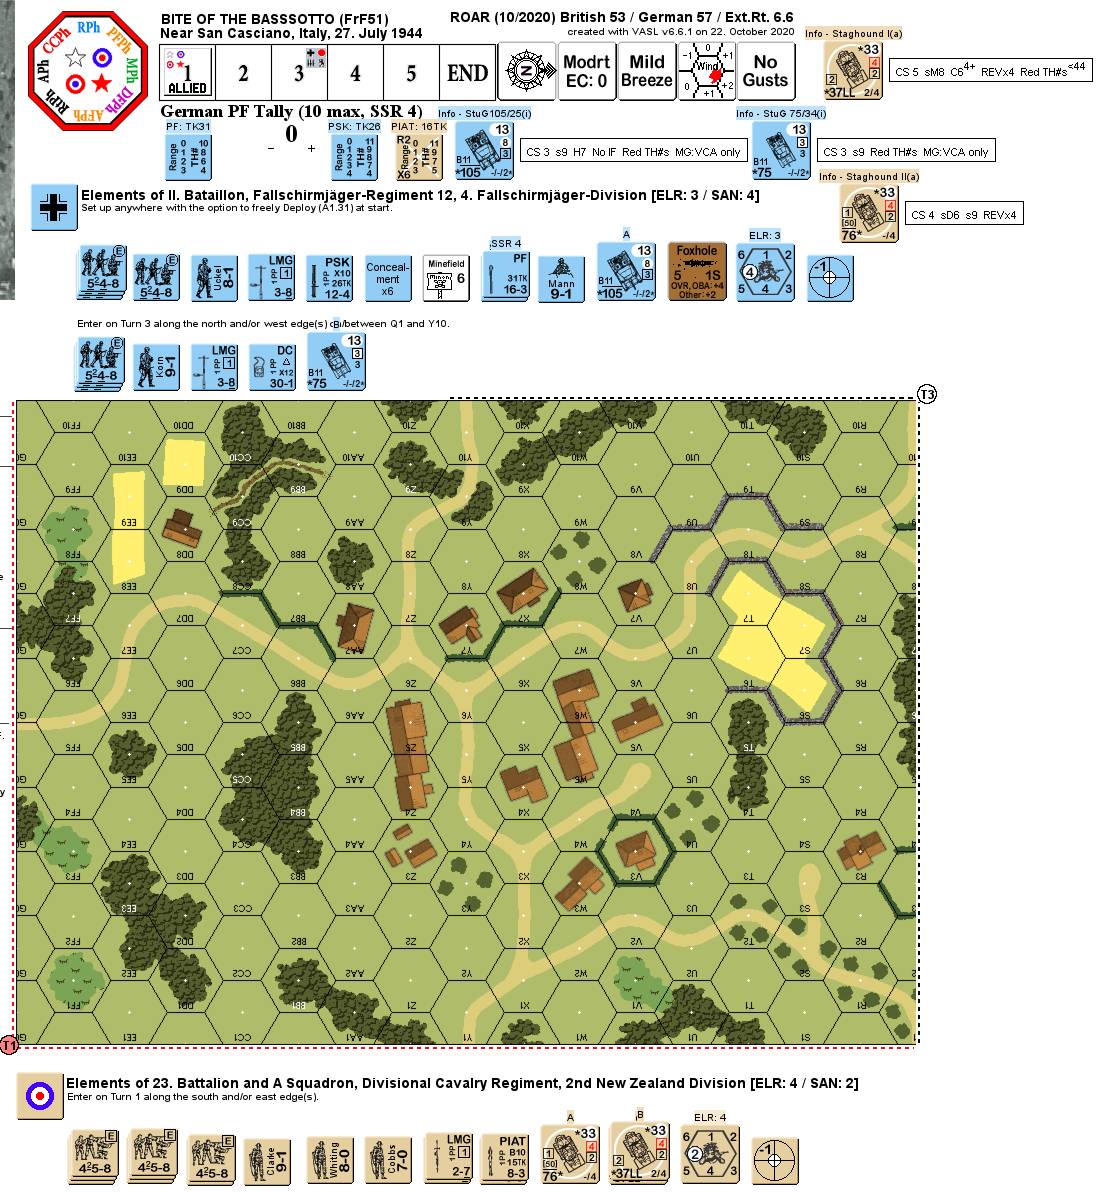
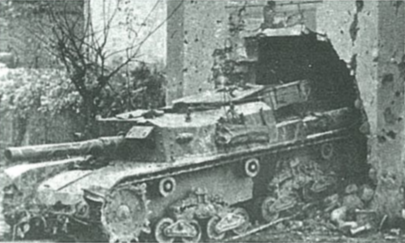
During six months of static mountain warfare around Cassino, the New Zealand Divisional Cavalry had found little use for their lumbering Staghound armored cars. This changed after Rome fell. In hot pursuit of the retreating enemy in the Liri valley, the Cavalry were often in the lead, receiving a liberator's welcome from the Italian population. This did not last long: at the end of July they ran into the outposts of the Gothic Line, defended by the hardened veterans and Bassotto (Dachshund) assault guns of 4. Fallschirmjäger-Division.Attacker: New Zealand (23 Battalion and A Squadron, Divisional Cavalry Regiment, 2nd New Zealand Division)
Defender: German (II. Bataillon, Fallschirmjäger-Regiment 12, 4. Fallschirmjäger-Division)
5 turns
Players: 2 OBA: None Night: No| Unit Counts: |
| Squads: A:8.0 D:7.0 |
| AFVs: A:3 Staghound I (a) x 2 Staghound II(a) |
| AFVs: D:2 StuG 105/25(i) StuG 75/34(i) |
| Guns: A:0 D:0 |
| Misc Rules: | D: StuG 105/25 may set up HIP |
| Map Board(s): |
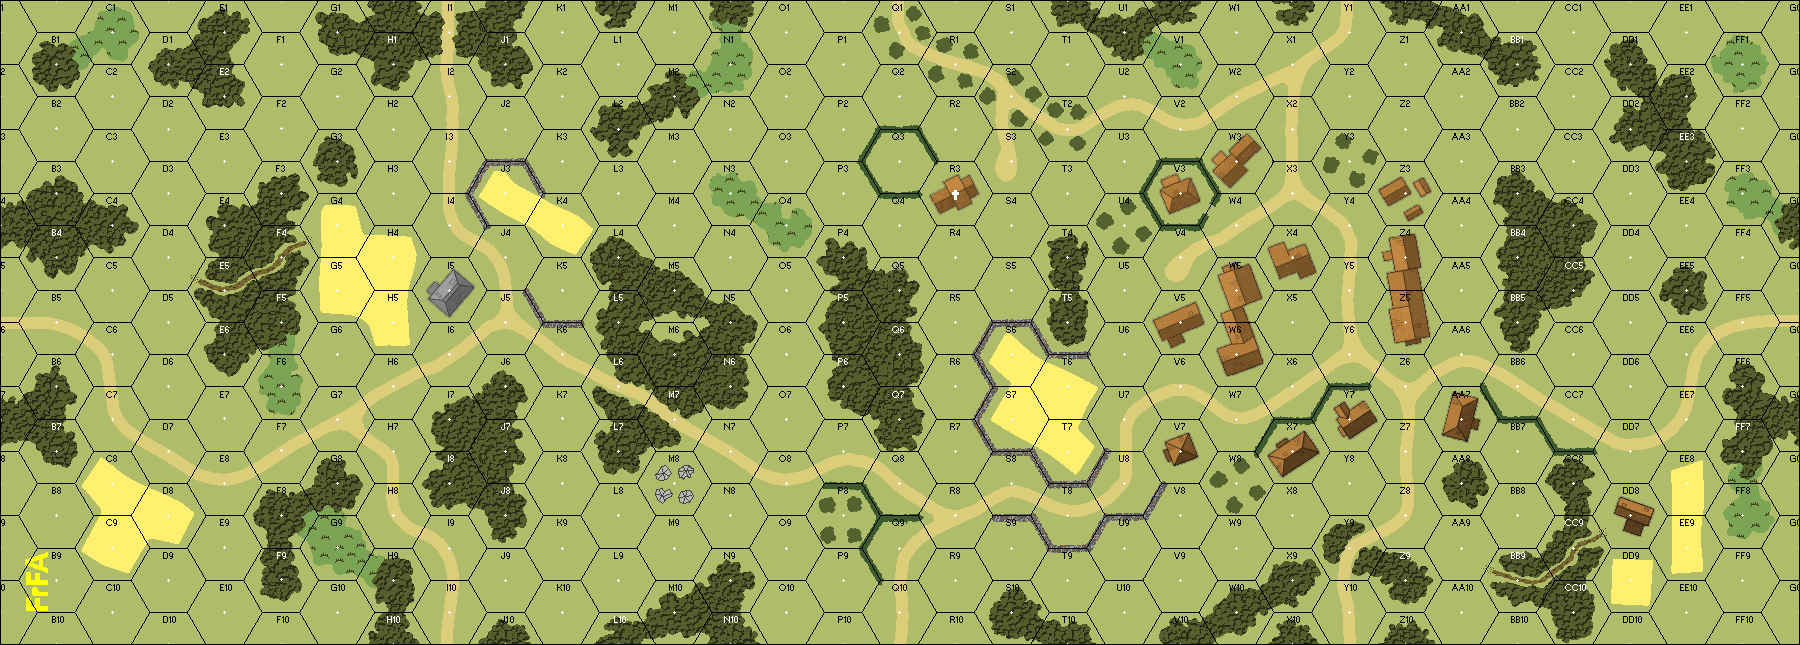
| Overlays: | NONE |
Errata (source)
Players wanting to play this game/Request a match:
Scenario info
Last Played:
| Date | Reporter | Opponent | Bal. | Result | Comments | |
|---|---|---|---|---|---|---|
| 2023-12-11 | (A) manzoli andrea | vs | Galletto | New Zealand win | ||
| 2021-01-09 | (A) nathan wegener | vs | Paul Works | New Zealand win | Opponent had a rough first turn losing 2.5 squads. I got a little over confident and let my armour get shot up. The counterattack pushed me back but I retook an empty building in top of turn 5 so he had to grab 2 buildings he got in position for 3 CC tries but couldn't clear me out. | |
| 2021-01-05 | (A) Maurizio Mai | vs | Ryan Kent | New Zealand win (VASL Log) | BoF19 version. The NZ decided to make a pinch maneuver, entering with bulk force (2 ACs, 2 leaders and 5,5 Squad) from NE and remaining from SW. NZ pushed to get to the village center before the German reinforcements arrival. The first AC was too bold and got blow up by a PF, this could have been a first turning point. In turn 2 the Bassotto declared itself, shot and ….. malf! First shot of the game. This was another turning point (MA was not repaired despite several attempts – every single RPh). But Turn 2 was not completed and the 2nd AC malf its MA. Another potential turning point. Summary: Turn 2 was not yet completed and 3 out of 4 AFVs (75%) in the scenario were either KIAed or with MA malf. On Turn 3 in CC the HS with the PSK was eliminated in CC and the PSK was recovered by the NZ. At the end of NZ player turn 3, the NZ won 4 CC out of 4 (this is the key of the scenario for the NZ with stealthy units). At this point the NZ troops were in the village from both sides. On Turn 3 Prep Fire the hidden German leader with a full squad and the LMG showed up in the middle of the village (house in hex X4) to spread fire on two MMC and the 9-1 NZ leader movement (flat and +2, PBF). One MMC did not broke. Another turning point in the scenario. German reinforcements came all together from NE to reach the village and support the “survivors”, in an effort to encircled the NZ troops without AFV support. However in the Defensive Fire, the NZ concentrated the fire on the German leader in X4. The stack become encircled and then broke. Being encircled and surrounded of NZ unit the stack was doomed. With the village secured by the NZ, the German retreated and the game was over. This is a scenario for CCs, and …. good luck as all the other ones. Average/# rolls: NZ 6,6/58; Ger 7,2/38 (to give an idea, to make it even the German player should have rolled 5 snakeyes…). I liked the scenario and would be happy to play it again. | |
| 2020-10-27 | (D) X von Marwitz | vs | David Wallace | New Zealand win | Interesting little scenario that gives both sides some unusual things to play with: Big Armored Cars for the ANZAC (remember, these are Stealthy), equipped with sM, Canister and SMOKE and two pre-recoreded PF and one 6 Factor A-P Minefield for the Germans along with two Italian Assault Guns which are powerful and brittle at the same time (No IF for either and only a VCA AAMG Armament besides). The Germans only have a small force with which to defend the village and need to deploy (SSR grants free deployment). This village has no real places to fall back and at the same time is not easy to attack. So the ANZAC can somewhat rely on their numbers to close is, some casualties are probably factored in while the Germans are supposed not to break all of their guys. So much for the theory... I managed to spring a few surprises on my opponent, who opted for a pincer attack, which is a good idea for inhibiting routing later. In CC, I ambushed one of his CX scouting HS, but gacked the roll. Later, I killed it generating a 8-1, however, as by then 'the masses' had closed in and routing/retreating to safety was difficult, my newly minted 8-1 and the HS went down just as fast. More importantly, the key 548+LMG, which was the sole squad that I did not deploy, broke, opening up a 'free entry' into the village from the west and was eliminated when No Quarter was declared - again, routing proved impossible in the situation. In the North, my flank seemed open, but there lurked the Bassotto covering some of the Eastern parts of the village, its flank guarded by the HIP HS with the PSK. Sure enough, as I had hoped, one of the ACs came up to threaten the Bassotto from behind and despitde it did not elect to stop, I needed an 8 to kill it. Rolled a 9 (which seemed become sort of a theme...). As a result, enemy infantry was not shrouded in Burning Wreck Smoke and took out the HS+PSK, while the surviving AC (37mm) killed the Bassotto - now having become the hunted - with a ROF shot and a TK of 3. This was more or less the turning point of the scenario, as the flank where my Germans would have been likely to prevail and where I intended to have my reinforcements enter was now infested with ANZACs, inclusive of an AC, a PIAT and *my* PSK. All what I had of a 'punch' in my forces was gone, so the ANZAC could close in and inhibit/delay the movement of my reinforcements. This must not happen in a 5 Turn scenario, if you want to win it. So I got pretty much busted with but a single HS of ANZAC losses of that early CC. Probably, this scenario would not have been such a one sided affair if my PSK had done its job. | |
| 2020-10-18 | (D) walter mcwilliams | vs | Tom Kerney | New Zealand win | Tom and I really enjoyed this scenario. I think it's a bit tough on the Germans but it came down the final turn and my Germans failed in their bid to retake one last building. | |
| 2020-05-27 | (A) Gordon Jupp | vs | Morris Legge | New Zealand win | Great game with Morris, the AnZacs took control by T3 and the counterattack stalled on the western edge of the village, very interesting scenario. | |
| 2020-03-02 | (A) Andy Beaton | vs | Patrick Palma | German win | Good progress made in pushing back the Germans until a retreating broken German squad managed a HOB into fanaticism while being interdicted. With only 5 turns, it took desperate measures to get the advance moving again and those measures failed badly. | |
| 2020-03-02 | (D) patrick palma | vs | Andy Beaton | German win | ||
| 2019-11-30 | (A) Paolo Cariolato | vs | Gaetano Girelli | New Zealand win | It's always a pleasure to play this scenario, Gaetano dispersed too much his defence and trying to defend everything he ended up with nothing. At the end of allied 3rd turn all he had was one german squad in melee, one leader and the Bassotto. He rightly gave it up. | |
| 2019-10-12 | (A) Jason Wert | vs | Robert Scripps Jr | New Zealand win | ASLOK 2019 | |
| 2018-10-25 | (A) Jeff B | vs | Martin Marquis | New Zealand win | I played a very aggressive 3-pronged attack with my infantry, capturing four buildings on my first batch of moves and exposing two dummy stacks. I played it very safe with my ACs however as I had no idea where his StuG was. I figured I needed to have a strong position by the time his substantial reinforcements entered on Turn 3. I knocked him down to two buildings on Turn 3 and his StuG finally showed its face, rubbling one of the buildings on the south side of the road and taking one of my HS and a 8-0 with it. This was bad news for him though as one of the more accessible buildings for him to retake was gone. His reinforcements managed to grab two back, but I infiltrated a couple HS to take one more. In the end he needed to take three back amidst highly desperate odds and he was stuck with three. A bit too small and dicey for my tastes. | |
| 2018-03-25 | (A) patrick palma | vs | Miguel Molina | New Zealand win | ||
| 2016-02-05 | (D) Allen Evenson | vs | Brent Morris | German win | 2016 NW ASL Championships Round 1. Came down to last the turn. My Sniper was able to break a squad in last building Germans needed to take back. Very enjoyable game against great opponent. | |
| 2016-01-23 | (D) Bill Brodie | vs | Aaron Cleavin | German win | Cancon 2016. This was one of the toughest wins of my ASL career. Aaron is an exceptionally good player, who is very methodical in his actions with every move and attack done with deliberate intent. Despite falling into every trap I set, he only lost on armoured car. My guys with pre-determined PF both failed 7 TH attempts in the first two turn, and he walking into and out of mines placed in a building hex without adverse effect. The end game saw me with five buildings in my control, although one had a melee in it, the winner would get control. I had to win that and get another building. Of course Aaron did everything to prevent that, even putting leaders by themselves to prevent entry to important hexes. He did leave me one opportunity. I moved a Half squad double time through smoke next to the building with the minefield. I think Aaron though I was going to move it into another building I which he had troops, but instead I advanced it into the building with the minefields, survived the attack, and gained that building. I also reinforced the melee, making it hard for him to kill all of the units, and making it easier for me to kill his unit, which I did. I rally pulled this one out of the fire to win! | |
| 2016-01-23 | (D) Rich Weiley | vs | Gordon McClelland | New Zealand win | CanCon 2016 - Round 1. Five boxcars in the first two turns meant I was never in the hunt in this scenario. My at start force was wiped out before the reinforcements entered. A shame as it looks like a decent scenario. | |
| 2015-06-13 | (A) Raoul Duke | vs | MH | New Zealand win | A very close game, that came down to the last Melee in the last turn. Definitely recommended. | |
| 2014-03-23 | (D) Eric Ortega | vs | Bill Forg | German win | Man this can swing back and forth depending on where the New Zealander attacks. | |
| 2014-02-20 | (A) Fred Ingram | vs | Chuck Dye | New Zealand win | ||
| 2014-02-14 | (D) Eric Ortega | vs | Travis Reed | New Zealand win | Down to the last Die Roll.... | |
| 2014-01-18 | (D) Michael Rodgers | vs | Joe Markham | New Zealand win | The SSR designated PF assignment and the HIP allotment give the feeble German start force a chance to hold onto some buildings until their reinforcements arrive. | |
| 2013-11-15 | (D) Simon Staniforth | vs | German win | |||
| 2013-10-27 | (D) Ian Morris | vs | Eric Gerstenberger | Draw | ||
| 2013-10-27 | (A) Paul Legg | vs | Stuart Brant | New Zealand win | Intensive Fire 2013 | |
| 2013-10-24 | (D) Ian Morris | vs | Pete Phillips | German win | ||
| 2013-10-05 | (A) Ian Morris | vs | Stuart Brant | New Zealand win | ||
| 2013-05-17 | (A) Andy Beaton | vs | Brian Wiersma | German win | Ftf CASLO 2013 | |
| 2013-04-09 | (D) Richard Carter | vs | Chris Doary | New Zealand win | Chris defeated me handily. I don't think I played the best defense and he basically overran me. | |
| 2012-11-29 | (A) Jeff Waldon | vs | Jeff Wasserman | German win | VASL-ASL Ladder Game | |
| 2012-06-02 | (A) Keith Colins | vs | Jeff Taylor | New Zealand win | ||
| 2011-11-21 | (D) Bob Callen | vs | Doug | German win | Good game, lots of back and forth action. Ability of units to come in on multiple edges as scenario progresses made it unpredictable. | |
| 2011-06-05 | (D) fabrizio da pra | vs | Philippe Briaux | German win | ||
| 2011-04-15 | (A) Simon Staniforth | vs | New Zealand win | |||
| 2011-03-20 | (A) Paolo Cariolato | vs | Martin Hicks | New Zealand win | ||
| 2011-03-05 | (A) Andy Beaton | vs | Jeff Ridpath | German win | Lost to German CC survivors running around in the backfield | |
| 2011-02-27 | (D) Paolo Cariolato | vs | FdPrà | German win | ||
| 2011-02-25 | (A) Eric Partizan Eric | vs | Martin Svard | German win | ||
| 2011-02-11 | (A) Paolo Cariolato | vs | Axe65l | German win | ||
| 2011-01-15 | (D) Paolo Cariolato | vs | Stefano Isella | German win | ||
| 2010-10-08 | (A) Richard Jenulis | vs | George Tournemire | German win | ASLOK 2010 | |
| 2010-10-05 | (D) Jeff Waldon | vs | Philippe Briaux | German win | ASLOK '10 |
View all or balance report
| Action | Date |
|---|---|
| CWO_19 Added a playing | 2024-01-17 22:58:14 |
| manzoliandrea72 Added a playing | 2023-12-12 06:17:46 |
| Bongiovanni Added a playing | 2023-01-25 11:36:13 |
| igycrctl Added a playing | 2021-08-25 17:04:32 |
| Maurizio.Grassi Added a playing | 2021-01-10 01:39:41 |
| File | Description | User | Views |
|---|---|---|---|
| VASL Map (FrF51-VASLMap.png) | After Action Report | bkemp01 | 1229 |
| (nz-germ.png) | Image | hoxson1 | 878 |
| (stug thru stone wall.png) | Image | hoxson1 | 667 |
| VASL Log file () | VASL Game Log | von Marwitz | 638 |
| VASL Log file (BoF19 Bite of the Bassotto_1.vlog) | VASL Game Log | Maurizio.Grassi | 896 |
| VASL Map (FrF51-VASLMap.png) | Map Image | bkemp01 | 1150 |
| FrF051 Bite of the Bassotto (FrF051 Bite of the Bassotto Map.jpg) | Map Image | Fre20741 | 996 |
| (FrF51 Bite of the Bassotto Scenario Archive.jpg) | Map Image | von Marwitz | 632 |
| Description | Uploaded by |
|---|
| Title | Author | Date |
|---|
| Description | Uploaded by |
|---|
Quick Map View
Location
Not found
Images

| Statistics: | ||
| Avg Rating: 6.86 | Votes: 50 | Views: | 4605 |
| To-Play list count: | 2 | |
| Estimated Play time: | 2.7 hours | |
| Recorded Games: | 38 | |
| Archive recorded plays: | ||
| New Zealand | 21 | |
| German | 16 | |
| Drawn: | 1 | |
| ROAR Data: (as of October 2023) Bite of the Bassotto [Confirmed] |
| [A] German | 62 |
| [D] New Zealand | 55 |